Quick Coconut Curry Chicken

coconut curry

I just overheard a gal talking about how cold she was. She was wearing a winter coat, scarf, gloves, and a beanie. It’s 65 degrees outside… While people all over the country struggle with record low temperatures, I’m walking around in a T-shirt, and I feel incredibly fortunate. But hearing someone complain about the cold, and thinking to myself that it is unusually cold, fills me with guilt.

I haven’t always lived in Southern California. When I lived in Denver, (which is an awesome city, by the way.) I had many mornings where I’d wake up, throw on the thickest robe I could find and my house slippers, shuffle out to my living room, and all I could see out my back door was white. White sky, white roofs, white streets, white everything. All I wanted to do at that point was make a warm beverage and go back to bed.

As fortunate as I am to be far away from this epic winter storm, I understand the value of anything warm, creamy, smoky, and comforting on a dreadfully cold day. For me, coconut curry is the perfect answer. Curry may not be the first thing everyone thinks of when they think comfort…but maybe it should be. It’s like spicy gravy, and spice and gravy are two of my favorite things!

The best thing about this dish, though, it’s that it takes 30 minutes to make including prep time. You can cut and prep your veggies by hand if that’s more up your alley, but when I want something quick, and homey, I buy pre-cut stir fry veggies, and pre-packaged curry mix, and my prep time for curry is almost zero!

INGREDIENTS

Coconut Curry Sauce:

1(13.5-ounce) can light coconut milk
1 tablespoon chili garlic sauce
1 package Thai red curry seasoning mix (see photo below)
1 can Geisha stir fry vegetables
2 teaspoons minced fresh ginger
3 cloves garlic, minced
dash cayenne pepper (this will make it very spicy. Use cayenne and chili garlic sauce to taste.)
salt and freshly ground black pepper

curry veggies and seasoning

Chicken:

8 ounces whole wheat pasta or brown rice
olive oil cooking spray
1 onion, chopped
1/2 pound boneless skinless chicken breast, fat removed, cut into small pieces (You may want 1 lb. I go light on the chicken.)
salt and freshly ground black pepper
1 cup scallions, white and green parts, thinly sliced
chopped fresh mint and cilantro leaves, for garnish
lime wedges, for serving

simmering curry

DIRECTIONS

For the sauce: In a medium bowl, combine all of the sauce ingredients, whisk until thoroughly combined and set aside.

For the chicken: Cook the whole wheat pasta or brown rice according to box directions. Drain and rinse under cold water, and (for pasta) spray lightly with olive oil cooking spray so it does not stick and set aside.
Coat a large nonstick skillet with cooking spray and add onions. Cook until translucent and beginning to brown, about 5 minutes. Add the chicken, along with more cooking spray, and season with salt and pepper. Saute chicken until lightly brown. Add the vegetables, along with more olive oil spray, and season with salt and pepper as you like. Saute for a few minutes just to release flavor.

Pour the coconut curry sauce over the chicken and vegetables, bring to a boil, and then reduce heat to low, and simmer for 20 minutes. Season with salt and pepper, as needed. Serve over rice or pasta, and garnish with chopped mint and cilantro. Serve with lime wedges, if desired.

Sriracha Devilled Eggs

Sriracha is everywhere right now. This makes me very happy, as I add Sriracha or Tapatio to everything. I can carry a small bottle of Tapatio in my purse, but Sriracha has to be refrigerated, which means no go on the travel size bottles with that iconic rooster label. (Having two different types of hot sauce in my purse might be pushing it a little, anyway.) Needless to say, I’m ecstatic to see Sriracha in restaurants, on TV, and popping up in recipes everywhere.

A few nights ago, Brian was watching one of those restaurant makeover shows on Travel Channel or Food Network, and they made a version of Devilled Eggs they called, “The Devil’s Eggs,” because they were loaded with Sriracha. Brian, who’s getting more and more into my idea of, “healthing,” things up and blogging about it, has started suggesting I make recipes he sees on TV.  I’m pretty sure he’s just using my new project as a way to try said recipes without having to make them himself, but these Devilled Eggs are fantastic, so I’ll just go with it!

I made a few changes, including replacing the traditional mayo with Greek yogurt and rice wine vinegar. If you miss the extra tang of mayo when you substitute Greek yogurt, just add a little vinegar. Yogurt’s a good substitute on its own, but the addition of the vinegar makes it almost indistinguishable from actual mayonnaise.

Hope you love these!

devilled eggs 2                    devilled eggs

INGREDIENTS
12 eggs
1/2 cup nonfat Greek yogurt
2 teaspoons Dijon mustard
4-6 teaspoons Sriracha hot sauce
2 teaspoons freshly squeezed lemon juice
1 teaspoon rice wine vinegar
Kosher salt
Freshly ground black pepper
Pickled carrots and radish, for garnish (optional)
Finely chopped fresh cilantro leaves, for garnish (optional)

INSTRUCTIONS
Hard-boil the eggs; cool and peel. Cut the eggs in half, length wise, and carefully remove the yolks. Set the whites aside.

Combine the egg yolks, yogurt, Dijon, lemon juice, vinegar, and cilantro in a medium bowl. Add 3 tablespoons of Sriracha. Season well with salt and pepper, then mix well until the yolks are broken up and the ingredients are evenly incorporated. Taste, and add more Sriracha to taste.

Spoon the yolk mixture into the reserved egg white halves. As desired, top with pickled carrots, radishes and chopped cilantro leaves. Chill until ready to serve.

Brian’s Steak or Chicken Fajitas with Black Bean Mango Salsa

Brian’s making fajitas with a black bean and mango salsa tonight. I can’t tell you how excited I am. Every artist has a standard repertoire, and fajitas are part of Brian’s. They’re also one of the only recipes in his, “repertoire,” I eat guilt free. As long as I can deny his, “babe, you want some more?” luring me to the dark side of over eating, his fajitas are a healthy, and incredibly delicious meal. Which — by the way — they should be. At it’s core, fajitas are nothing more than grilled meat, vegetables, and tortillas. Ingredients that make up a pretty well-rounded, healthy plate. Unfortunately, depending on who prepares them,  fajitas can be terribly deceptive. Chevy’s chicken fajitas, for example, have 870 calories, and 37 grams of fat per serving! Their steak fajitas have 790 calories, and 49 grams of fat! Oh, and, by the way, that’s without tortillas! Wha Whaaat?!? Who eats fajitas sans tortilla?!?

I’m not sure why some restaurants or recipes call for so much oil and fat; fajitas is a meal that truly does taste as amazing when prepared with calorie and fat content in mind as it does when only taking taste into consideration. I hope, after trying Brian’s, you agree. Enjoy!

Black Bean and Mango Salsa

black bean and mango salsa

Ingredients

1 1/2 can (12-14 oz each) black beans drained and rinsed

1/2 red onion very thinly diced

1/2 mango diced

1 can (12-14 oz) diced tomatoes

1/2 can (12-14 oz) sweet corn drained

1 tbsp diced cilantro

1 tbsp hot sauce (I use tapatio)

1 tbsp olive oil

salt and pepper to taste

splash of fresh lemon juice

Directions

Mix all ingredients thoroughly in a large bowl. Cover and chill. The longer it chills, the better it is. Make it a day in advance, if you can. If not, chill while you’re making your fajitas. Taste and add more salt, pepper, and hot sauce before serving.
Fajitas
Ingredients
1 lb flank steak/flat steak or chicken
1 green bell pepper sliced thinly
1/2 red onion sliced thinly
1 cloves diced garlic
1/2 packet (1.27-ounces each) fajita seasoning mix
4 tbsp Olive oil
Salt and pepper to taste
Tortillas as desired
Greek yogurt
Hot sauce
Directions
Season both sides  of meat with 1/4 packet of fajita seasoning, salt, and pepper.  Lightly oil grill, grill pan, or frying pan. Grill the meat over medium-high heat for 4 minutes on each side and then transfer to a cutting board, cover with tin foil, and let rest for 10 minutes. Once rested Slice into thin strips.Once the meat is off the grill pan and resting, oil the grill pan again, and then add the bell peppers, onions, garlic, and salt and pepper to taste. Grill the mixture for 2 minutes at medium high. Turn down to medium low, and saute for 5 minutes, stirring occasionally.

Add remaining fajita mix to pan, and return meat to the pan, with 1/4 cup water. Bring mixture to a boil, and then lower the temperature to medium low, and simmer for 5 minutes.
While fajita mixture is simmering preheat oven to 350. Warm the tortillas in the oven for 1-2 minutes. Plate tortillas, and top with greek yogurt, hot sauce, and black bean mango salsa as desired. Add fajita mixture, roll, and enjoy!

Two Simple Chevre Salads (a.k.a. You’re Gonna Love Goat Cheese!!!)

Brian and I love farmers markets, and have found a favorite in each city we’ve lived in. True, last Saturday, a one-armed man kicked our Frenchie, Baxter, out of our local market, calling him a, “health code violation,” but there’s just something about wandering around, letting what’s in season in the region dictate what you buy and cook for the week. Yes, I was once seriously scolded by a farmer for buying avocados at the (gasp) grocery store, but I enjoy talking with people who have a hand in growing the food I eat. The fact that the samples they’re pushing really are tastier than anything you can buy at the grocery store is the cherry on top.

About two years ago, Brian and I moved across the country for what we thought would be a 6-10 month stop on our way to the bay area, or one of our other top cities. With that in mind, we spent our first year here going out of our way to not put down roots, and another 6 months trying to move.

It’s a funny thing settling down in a city you never meant to live in. If it were up to Brian or me, we wouldn’t be here; a fact that’s made getting to know our, “new home,” awkward and tough. We went out of our way to not make friends, or join groups, or activities, hoping above all hopes we could move away to one of the cities on our, “it,” list. But — nothin for nothin — life, your surroundings, happiness, etc, is usually what you make of it, and people tend to find exactly what they’re lookin for. So instead of looking for all the reasons not to live here, Brian and I decided to embrace our, “new,” city, and put down some roots. Step one: last Saturday, we turned our trip to the farmer’s market into half a day of checking out the parts of our quaint downtown we’d not yet seen. We had a blast. The weather was perfect. The photos were unbelievable, but that afternoon I got food poisoning from the hip burger joint where we had lunch…Fortunately, there are dozens more restaurants downtown. With a few more outings, we’re bound to find a couple go to spots.

We ended our morning at the farmers market. My favorite finds of the day were 3 beautiful, perfectly ripe heirloom tomatoes. All 3 different colors — 1 yellow, 1 red, and 1 a combo of green, red, and purple — all 3 begging us to eat them as quickly as possible. Brian made bruschetta, and, believe it or not, both of the following recipes were inspired by Brian’s bruschetta and our heirloom tomatoes. I dare you not to love, love, love both of these 60 second salads!

my take on capresestrawberry chevre salad


My Take on Caprese

Ingredients

1 heirloom tomato

2 oz. goat cheese

2 tbsp. olive oil

2 tbsp. balsamic vinegar

4 leaves basil

salt and pepper to taste

Preperation

It’s simple: cut the heirloom tomato into 1/3 inch slices, and spread, evenly, across a plate. Drizzle the olive oil and balsamic over the sliced tomatoes. Crumble the goat cheese over the tomatoes. Chiffonade the basil, and sprinkle over the goat cheese. Salt and pepper to taste. Enjoy.

Strawberry Chevre Salad

Ingredients

2 cups fresh strawberries

2 oz. goat cheese

1 tbsp. balsamic vinegar

4 leaves basil

Preperation

Even simpler: slice the strawberries, and plate. Crumble the goat cheese over the top. Then drizzle balsamic over the strawberries. Chiffonade the basil, and sprinkle over the top. Enjoy.

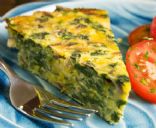
Crustless Spinach, Onion and Feta Quiche (original recipe posted on sparkpeople.com)

My sister, Bethany, sent me this recipe from sparkpeople.com. Click here for the original recipe.

Honestly, my tweaks were so minor, I am essentially re-posting sparkpeople.com’s quiche recipe. (As well as their photo.) I added tomatoes, used soy milk instead of non-fat, and replaced half of the all purpose flour with whole wheat flour. (I KNOW we should only be eating whole wheat flour, but, to me, it just doesn’t taste as good. I’m sorry!)

There are 5 great things about this recipe: 1) if you slice it into 4 servings, it has less than 250 calories, 2) It’s as easy as mixing a few ingredients and throwing them in the oven. 3) you can use whatever veggies you want and love, essentially making a brand new quiche every time you bake it. 4) It tastes as good cold, the next day as it does right out of the oven. 5) It’s soooooo good! Thanks, Bethany!

crustless spinach quiche

Crustless Spinach, Onion and Feta Quiche

Technically crustless but the addition of flour makes for a delicious crusty bottom and sides to this quiche.

INGREDIENTS

1 medium onion, diced

6 oz (about 1 large handful) spinach

1 roma tomato, diced

2 lg eggs

1/2 cup eggbeaters

1/4 cup all purpose flour

1/4 cup whole wheat flour

1/2 tsp baking powder

1/4 tsp salt

pinch cayanne pepper

1 1/3 cup soy milk

1/2 cup feta cheese

DIRECTIONS
Preheat oven to 400F.
Lightly grease a 10-inch pie pan
Coat a medium frying pan with a good amount of cooking spray. Add diced onion and cayenne pepper. Salt and pepper to taste, and cook over medium-high heat until translucent and tender (about 3 minutes.) Add in fresh spinach and cook until just wilted. Set aside to cool for a few minutes
In a large mixing bowl, whisk together eggs, flour, baking powder and salt. Whisk in milk, then stir in spinach-onion mixture, as well as diced tomatoes.
Pour quiche base into prepared pan. Top with feta cheese.
Bake for 25 minutes, or until center is set and the outside edge is golden brown.
Let set for 5 minutes, then slice and serve.